Friday, June 20, 2025

Weber Summit Kamado vs. Big Green Egg vs. Kamado Joe vs. Primo Grill

Let me start this by saying I am not a grill snob at all. You can smoke by digging a hole in the ground. You can grill with a few cinderblocks and a grate. I have an $8 clearance grill that I still use. But I also have a $1250 Weber Summit Kamado. Both produce fantastic food but its a lot easier to cook on and maintain the Summit. It also fits a LOT more food!


Three years ago, in Spring of 2022 I was in the market for a new primary grill. I had a Big Green Egg (Medium size) and wanted something larger. I was initially between the BGE and the Kamado Joe. After some research, I was between the Weber Summit Kamado (which, spoiler, I eventually purchased) and the Kamado Joe. After cooking on the Summit for three years I am convinced that I made the right choice. If I was in the market again, I'd buy the Summit again, although I might consider a Primo XL for reasons I'll outline below. Here are the Big Green Egg Medium and the Weber Summit Kamado side by side:


It's worth noting that not all Ceramic Kamados are built the same. Here is the founder and owner of Primo Grills doing a factory walkthrough: https://www.youtube.com/watch?v=o1b_A0GdHoU . At around the five minute mark, he puts a bunch of competitor Kamados through the same kiln process that the Primo goes through. The Primo and the Big Green Egg are unscathed. The Kamado Joe has significant structural cracks, and the cheap Chinese Kamado has just melted into oblivion.  

Up next, here's Amazing Ribs talking about the drawbacks of Ceramic Kamados (which really boils down to the inability to do multi-zone grilling well):
https://amazingribs.com/ratings-reviews/grill-smoker-combos/kamado-ceramic/

And, there are a few things that ceramic cookers like the BGE or the Primo do better than the Summit:

Ceramic Pros:

  • Temperature retention. Because they're so heavy (the Big Joe is nearly 500 lbs), there's a LOT of thermal mass there. Meaning when you get your temp dialed in perfectly, the temp swings are going to be a lot more gradual. This may make them better in extreme Winter climates, like Canada.

  • Baking. Ceramic Kamados are essentially brick ovens you can open. Because the lid gets so hot, and holds that heat, it will radiate evenly down from the top, allowing for pizzas or even bread baking.

  • Rustproof. Because they're ceramic, the body of the cooker won't rust. The cooking grates will rust, of course, as will the hinges and bands and doors, but those can be replaced easily. Having said that, most people don't have problems with Weber grills rusting unless they're in extremely salty, damp environments. This might be why Kamados are preferred in Hawaii and other island communities.


Weber Summit Pros:

  • Versatility. This is the biggest reason I like the Summit. It can do any cook out there. I can sear a steak at 1000+ degrees or smoke a brisket at 225, within minutes of each other. I can set up half the grill for direct and half for indirect. I have a second rack, allowing for up close searing, and further away roasting. I can do a charcoal snake or a kamado-style indirect with covered coals in the base. I can use briquettes or natural lump or char-logs. I can smoke with chips or chunks or even split logs. BGE's really have two modes of cooking: direct and indirect, and you have to pick which one you want before the cook. Kamado Joes have a system that allows you to do half-and-half, but you can't really change it up mid-cook.

  • Temperature Control. The Summit is a lot lighter and it has less thermal mass. If you overshoot or undershoot your temps during a cook, its really easy to recover and adjust.

  • Durability. The Summit is made out of steel. Mine has fallen over and had a cantilevered umbrella fall on it, and there was no damage or scratches at all. Worse comes to worse, it MIGHT dent, which would be a minor blemish. A ceramic cooker will shatter. I had the inside portion of my egg crack after years of use. BGE replaced it on warranty with no questions asked but it still happened.

  • Portability. Because the Summit is a lot lighter it can be pushed around with ease. I move mine around on the patio depending on whether its raining or where I feel like sitting that day. I move it into the grass to clean it. I would never move my egg except how you might move furniture. It was very heavy, fragile, and generally stationary.

  • Ash management. The Summit has the Weber ash cleaning system which allows you to easily clean out ash, even in the middle of a cook. This is important because on the Egg I would run into issues where the ash would buildup so much it would impede airflow and temps would drop. Cleaning out the ash on the egg requires complete disassembly and simply isn't possible during a cook. The Kamado Joe is a little bit easier with its ash drawer, but you can still get ash buildup all around the edges that require disassembly to clean.

  • Cleanability. You can wash it with a garden hose, inside and out, scrub it with soap and water, or organic cleaner, or whatever you like. Ceramic cookers are very porous and you're not supposed to use any cleaners or liquids on them. All you can do is burn them super hot to burn all the gunk away... which you can also do on the Summit. 


If I were to buy a new cooker tomorrow, I'd buy the Summit all over again. If I were 100% invested in getting a Ceramic cooker, I'd get something that can do multiple zones, like the Primo.

Wednesday, June 18, 2025

Sous Vide Pork Loin Chops, Charcoal Finished

I've had a lot of chicken, beef and fatty pork cuts recently and I thought I'd change it up with some leaner cuts: A Pork Loin. This particular one from the butcher wasn't cheap, but it was near-identical to the dirt cheap $12 ones that Costco sells.


 First thing we do is portion is out and dry-brine it overnight in the fridge, uncovered. We essentially salt it heavily with Kosher salt then let it dry out. Dry-brining does not cause things to taste dry. The opposite, in fact, it will tenderize it and taste better and allow it to cook faster, resulting in an overall juicier end product.

The next day we put it in a vacuum bag and throw it in the Sous Vide. I put it at 133F which is about as low as I'd ever want to go for pork. I think it went for 8+ hours but you could go as short as 3 hours or as long as 12. Maybe longer, I don't have a lot of experience with long Sous Vide cooks yet. I understand that the longer it goes, the more rendered the fat will be, the more tender the meat will be. But go too long and it could over-render the fat and cause it to dry out.


 At around the 8 hour mark we took it out and cut it up into thick about 1-inch Pork Chops. 


 Now is the time to season it. I seasoned with Black Pepper only. Usually I like simple seasoned meat.


 Today we're going to use the little charcoal grill. We're going to get half a chimney of Kingsford briquettes rip-roaring hot and dump them in the grill. When they're burning fire hot, we'll put the chops on.


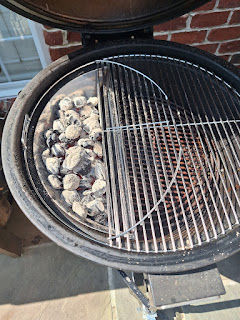
This is my $8 clearance grill. I could use my Weber Summit Kamado but sometimes I like to show that you don't need an expensive cooker to cook good food. Just an $8 grill and 50c worth of charcoal.


 Let the chops take the fire! Just flip them regularly, every 15 seconds or so at this point, and pull them off when they are visually done. You want a small little bit of black char and you want as much browning as possible.


The end result was absolutely perfect. The best Pork Chops I've made yet. Perfectly cooked interior, juicy, flavorful, and the fat was soft on the inside, crispy on the outside, and tasty. The flavor of the pork balanced well with the char and smokiness from the coals. 

Random note: I will not buy Smithfield Pork because it does not taste like pork to me. It tastes like nothing. For some reason their pork has almost no flavor. Swift is good, so is your local butch.


PS I got new casters for my grill table. Big Casters make rolling it SO MUCH EASIER. Don't cheap out on the casters! 

Tuesday, June 17, 2025

Father's Day Seafood Grill Up

I love grilling seafood! It breaks up the monotony of Beef / Pork / Poultry, feels high-end, and often doesn't cost an arm and a leg. These days you can get Salmon for cheaper than most steaks and an entire bag of shellfish for less than a $15.

They also grill up easily so long as you know what you're doing.

I like to use general purpose seafood seasoning, like Old Bay, Lemon Pepper, or something generic and labeled "Seafood Seasoning." It's hard to go wrong and a little bit is all you need to add some flair. 

Clams and other live shellfish are the most work, just because you have to clean them. You make a salt water brine (30g or 1oz for every liter of water), scrub the clams, drop them in, and they'll spit out all of their gunk and sand. We typically put them in a pot with white wine, garlic, and butter, then just cook them indirect until all of the clams open. If some of them are stubborn and won't open, pull them out with tongs and put them on direct heat right above the fire and they will pop open. You'll get some great smokey flavor this way also!

Sausages I like to cook over direct heat, but far. That's why I like the second level grate. It crisps up the skin and gets good color and brings them up to 180F+ without burning the outsides/undercooking the inside. That coiled polish rope sausage can be cooked the same way.


Scallops can be cooked over hot-hot direct heat. Baste each side with butter and pull off at 135F or so. They'll reach that temp quick and won't burn. I cooked them from frozen and these were still probably the best scallops I've done!

Lobster should not be cooked from frozen and I found that out the hard way. It should be thawed and the shells butterflied and popped open before starting the grill! I thought these could thaw indirect on the grill but it was taking too long. So I moved them to direct heat. This cooked the insides unevenly, burning the area closest to the shell and undercooking the center. Eventually I had to discard the shells entirely and cook them shell-less to get everything even. Basted in butter they were still delicious, although a little unsightly!

Dessert was a delicious, decadent, rich S'Mores Pie that I had requested from America's Test Kitchen. Thank you to my wife and my wonderful family for a great Father's Day!


Sunday, June 15, 2025

Low Profile Slow 'N Sear on the Weber Summit Kamado

I have had the Weber Summit Kamado for three years now (Purchased June 8 2022) and it has been a fantastic, versatile cooker that truly thrust me into the world of grilling and smoking. I say cooker because it is both a fantastic grill and a fantastic smoker.

However, after three years, the Weber charcoal baskets that came with it have rusted and warped. They're still functional, in that they still stabilize the charcoal, but the warping is ugly and they no longer fit together perfectly adjacent and parallel. 

I probably would have stuck with the baskets except that the center grate on the Weber Gourmet BBQ system ALSO rusted out and warped. However, this is because I put it at the bottom of the grill and used it as an impromptu charcoal grate. It now no longer fits well into the center of the grates. Furthermore, the grates were perpetually covered in surface rust and I had to constantly scrape them down and oil them. 


So, I was in the market for new grill grates and new charcoal baskets and I decided to go all-in on Slow 'N Sear.

I was looking for baskets and grates that were 316 Stainless Steel but couldn't find anything, except a few grates for Propane Grills. The best baskets I found were 430 SS (only the Slow 'N Sear ones) and the best grates I could find were 304 Stainless Steel (found a few, including the Slow 'N Sear ones). I also went ahead and ordered the actual Slow 'N Sear Low Profile, as well as the heat diverter / griddle to round it out. (The griddle has not arrived as of this review, but it was all ordered from Amazon.)

All of this is better than the Weber original products which claim to be "aluminized stainless steel" and I don't think that holds up to heat as good as 316, 304 or even 430 Stainless Steel.  

Anyway, everything arrived well packaged and perfectly polished. I don't think there was even a finger print on any of them. 


The new baskets obviously look much better than the old rusted Webers. They are also solid, welded construction, very heavy, and came with a water trough for steam and for keep consistent temps.

They are taller than the original baskets, which is a mixed bag. The don't fit on the upper rack of the Weber Summit, but they do BARELY fit on the lower rack of the unit. I'm excited to use them, but we won't be doing it not for today's cook.


Today's cook we're using the Slow 'N Sear as well as the new grill grate. You can see how much sharper it looks, and it fits the Summit like a glove. It fits with the old grate as well as the new perfectly well.


The first thing I noticed was that takes exactly a full chimney of charcoal! Like, EXACTLY. I believe this has to be intentional. 


I poured the coals in and did my grill. Today I cooked up Salmon, Strip Steak, Beef Back Ribs, and Chicken Thighs. There were also some veggies, not pictured.
 

My first thought is the Slow 'N Sear, when used during a high-heat grill in this fashion, offers EXTREME two-zone heat. I actually don't like it for most of the food. It worked great for the steak but for everything else I prefer to have medium heat as an option. This could be accomplished by putting a few coals on the bottom grate to the side of the SnS, or by having a second-tier grate (which I have, and impatiently left on my old grate before this cook) allowing for further direct heat. For thighs, sausage, veggies, and salmon, having medium direct heat is fantastic. For the steak it did perform a great reverse sear and I did use their "cold grate" spin technique successfully. 

The grate itself was flawlessly constructed. SnS markets it as an "Easy-Spin Grate," and I was surprised to find that it actually does spin a lot easier than the standard Weber Grate. I'm not sure what SnS does to make it "Easy-Spin" but it works. Furthermore, the hinge sized exactly for the SnS proper feels cohesive.

The last thing I did was add a little bit of Lump Charcoal into the SnS and leave the Back Ribs on the grill for another 4 hours or so. This tested the "Slow" portion of the Slow n Sear and it performed flawlessly for that cook, just as easy and hands-off and set-it-and-forget-it as using the Weber Summit with the standard heat diverter. I would be comfortable using the Slow 'N Sear for a long, slow smoke, but I don't think it can hold enough coal to go for more than 6 hours, 8 tops. Meanwhile I have done 16 hour cooks on the Summit and had fuel leftover. 


 So, the million dollar question is, do I recommend the Slow 'N Sear for the Weber Summit? I suppose it does exactly what it advertises and from that perspective I can recommend it. I can recommend it if:

  • You have trouble maintaining temps on the Weber Summit Kamado and want to try a new way to smoke.
  • You like to refuel frequently and don't enjoy disassembling the WSK to add new Charcoal.
  • You want a replacement for the Weber Baskets for Hot and Fast grilling.
  • You're trying to perfect your Reverse Sear on steaks
  • You're willing to spend $100+ on a premium product.

The SnS proper cost me $100 (and that was a sale) so its quite a premium above the $20 Weber Baskets or $10 knock-off baskets. Here's hoping they last! 


Saturday, June 14, 2025

Poor Man's Brisket on a Poor Man's Grill

Smoking and grill meat is a tradition over 1,000,000 old. Anthropologists have found evidence of cooking from proto-humans, so we've been cooking for longer than we've been homo-sapiens.

What I'm saying is that Smoking and Grilling is easy and people have been doing it on crude equipment for a long time. You can smoke by digging a hole, or by setting up a grate on cinderblocks or stones. You can also smoke on an $8.00 Clearance portable grill from Target.


The point is that you do not need a $2000 or even a $200 smoker to make great food! I made some of the best food I'd ever made on this for this cook.

The meat I cooked was a Chuck Eye Roast. Some people call Chuck "Poor Man's Brisket" but the Chuck Eye specifically is close to the ribeye. Therefore you can cook it to Medium Rare (135F) like a Rib Roast and it will still be juicy and tender and flavorful like a good Ribeye, as opposed to low and slow and high like a proper Chuck Roast or a Brisket (203F+)

That is a quarter-sheet tray, small enough to fit in a Toaster Oven. This is a tiny 1.85lb roast, that I got at Wegmans for $12. This was not on sale. I dry-brined it overnight by liberally coating it with kosher salt and leaving it in the fridge overnight. This pulls moisture, resulting in a shorter cook, and more flavorful meat. It also tenderizes the meat. I scored the fat, as I always do for nearly every cook that has a large piece of fat like that.

We will be cooking this roast like a reverse sear. Low and slow for step one, then hot and fast fire for step two. So, the next day, I set up the grill for two-zone heat. This really just means coals on one side of cooker for indirect cooking. For a large grill you can use whatever charcoal you like and I frequently use Natural Lump. BUT, for a small grill you should use briquettes. Natural lump burns from the outside-in, and there is a minimum size critical mass necessary for Lump You need enough to form some small pockets where the Lump can concentrate heat, sort of like the interior of a campfire. This is not true of Briquettes. You can light a single briquette, and that briquette will continue to burn until it is exhausted, because the entire briquette burns evenly, forming a lattice of air and fuel pockets inside itself. The water pan is necessary in small cookers like this for two reasons: it keeps the charcoal away from the meat and further reduces the direct heat during the slow-cook phase. 


   I used 25 Kingsford briquettes which I calculated at 67 cents worth of charcoal. I used a charcoal chimney I purchased twelve years ago for $15. I also used some mesquite chips I had lying around but I wouldn't put more than 25 cents. The water pan was 39 cents. So overall, including the meat and the grill itself, I'm still at around $21 for the whole cook! 

 I put pepper only on the roast. You can pretty much put whatever seasoning you want on the meat. This is the least important step IMHO, Beef especially will stand up will to most seasonings and you could put pretty much anything on there: Taco Seasoning, BBQ Seasoning, Mediterranean Season, or just plain pepper like I did.


You can see in the above picture that the meat is off the direct heat, but the fat cap is facing the heat. Whether you are cooking a roast, a brisket, a steak, chicken, fish, you always place the fattiest portion towards the heat. So for a roast you put the fat cap towards the heat. For chicken you face the dark meat towards the heat. For fish you face the skin towards the heat. This ran for about one hour until the roast reached 115F. You can take it further if you want a Medium or Medium-Well roast, but I would start the direct-heat portion about 10F less than you want the pull-off temp, or 20F less than you want the FINAL temp. It will go up about 10F during the direct heat phase and another 10F during the rest period.

 At this point it is time to remove the water bath and rake the coals into a pile. You want them touching, you want them feeding each other, you want them hot. You can blow on them a little bit to get them even hotter, but do this with the meat off so you don't get ash all over your roast! 


 Flames are welcome, even encouraged during this step. You want HIGH, HOT heat. You should flip consistently, every 30s to every minute. You want to develop a dark brown crust. Black is alright but you don't want too much char or it will taste bitter. 

It will be done once the crust has developed AND the interior temp is 10F less than the target temp. So for medium 135F shoot for 125F and it will carry-over cook about 10F. 

This turned out to be one of the all-time most delicious roasts I've made. Just as good, if not better, than many of the Ribeye roasts I've made over the years. I will definitely be buying this cut again! At $7/lb (at a high-end grocery store, no less!) it seems like it might be one of the last remaining true Butcher's Cuts, since Ribeye roasts can easily go for 3x-4x that price.

We served with Mashed Potatoes and Roasted Summer Squash, and did not have any leftovers.  

Tuesday, June 3, 2025

Beef Back Ribs

Beef Back Ribs are incredibly cheap and incredibly rich, decadent, and delicious. 

In the current climate of dieting and savoring rich delicacies, I'm honestly surprised this butcher's cut isn't more popular! 

So keep this secret quiet!

Beef Back Ribs cook up richer and fattier and more intense than Pork ribs, and even more-so than Beef Plate Ribs, although you do get a lot less meat. But the bites you do get are so flavorful, so opulent, that I find it difficult to eat more than one rib at a time. They are a delicacy, and best to cut up into small, succulent bites.

The do extremely well smoked (although you could sous-vide or oven-roast them) but they need a lot of time to break down the fat and connective tissue, even more than Pork Ribs. My recommendation is the strongest wood you can stomach (for me that is Mesquite but for you it might be Hickory or Oak) because the beef can stand up to it. I also like to rub it with Steakhouse Seasoning, that gives it an extra kick and makes it taste a little bit more professional in my opinion. 

 They are a 6-8 hour cook at around 250F, but cook them until they're as bendy as you personally like them. 


Tuesday, May 27, 2025

Time and Temperature


The most important thing about smoking meat, grilling meat, or just plain cooking meat in general is understanding the relationship between Time and Temperature. 

"How do you like your steak?"

It depends 100% on the cut. A filet with little to no fat on it should absolutely be cooked rare (<130F). Counter-intuitively, the lower quality the meat, the less fat it will have and therefore the more important it is that it be cooked Rare. Conversely a Wagyu filet (with a TON of fat marbling) could be cooked medium well (150F) and still taste absolutely delicious because the fat will keep it tender. I would personally argue it should be cooked Medium-Rare to Medium (137F) and not Rare (130F), because we want that fat partially rendered.

Similarly, other cuts like a Prime Ribeye with a ton of fat on it are also best cooked to Medium (140F). Rare to Medium Rare just doesn't render the fat enough and we can end up with a slightly rubbery texture for certain bites.

"My Michelin Chef serves Ribeye rare." 

Now we get into Time. A High End Steakhouse might sous vide their Ribeye for 4 hours at 130F then hit it with a blowtorch and serve it immediately. This would technically be "rare" BUT they still managed to render a bunch of fat. Chef might say, "Order it Medium Rare" because he gets the rendering from the fat and the 132F serving temp gives him some wiggle room to get a good crust with the torch.

Most places though are probably doing reverse sear or forward sear and that's where the Medium comes into play. We want a little extra time in the oven / smoker / drawer to render that fat. 

Then of course we have BBQ meats, like Bristket or Ribs or Shoulder. These cuts we cook WELL PAST Well Done (165F) , for hours and hours and hours, up to 200F+ until the hard thick fat has just completely rendered and the long tough protein strands have started to break down, and we get tender or even shredded meat.

Underdone BBQ is like Overcooked Steak: Dry and Tough

Overcooked BBQ is like cat food: stringy and mushy and falls apart.

But why?

When our cooked-to-130F Steak tastes moist, it's because of juices / water Moisture.

When our cooked-to-205F BBQ tastes moist, it's NOT water, it's fat. It's rendered fat.

We get a lot of questions about Chuck Roasts. People cook their chuck roasts "like a Brisket" up to 203F, but it is still "dry and tough." Even though it hit 203F, it is still under-cooked.

This is because of TIME and Temperature. Basically every minute spent over 130F, the fat is rendering in some capacity. Briskets are comparably easy to understand because to get them up to 203F, they've spent 10+ hours rendering. They've got a huge thermal mass that takes a while to come up to temp and have a nice gradual cook. A Chuck Roast is as tough as Brisket, it comes from the next muscle group. But they're cut much smaller, and so shoot up to 203F in only about 4 hours, and don't have as much time to render. So we keep cooking it. But we need to make sure we don't burn the exterior or cook it so hot ALL the fat renders and it ""dries out."" So, we can keep it in a broth bath for more gentle cooking. We can spritz it. We can sous vide it. We can ""rest"" it (carry-over cook) at 160F+. But it needs more time to break down.


Weber Summit Kamado vs. Big Green Egg vs. Kamado Joe vs. Primo Grill

Let me start this by saying I am not a grill snob at all. You can smoke by digging a hole in the ground. You can grill with a few cinderbloc...